DIY Blinds and Window Awnings: Your Online Shopping Guide
Windows are often considered the eyes of a home, offering a glimpse into its soul. They let in natural light, provide ventilation, and connect us with the world outside. But to truly enhance the beauty and functionality of our windows, it's essential to dress them with the right blinds and window awnings.
In this guide, we'll delve into the world of DIY blinds online and window awnings, empowering you to transform your living space with style and affordability.
Understanding DIY Blinds and Window Awnings
Before we dive into the nitty-gritty details, let's clarify what DIY blinds and window awnings entail. DIY, short for "do-it-yourself," refers to the practice of creating or assembling something yourself rather than purchasing a pre-made product.
In the realm of window treatments, DIY options allow homeowners to customise their blinds and awnings to suit their specific preferences and requirements. This approach offers numerous benefits, including cost-effectiveness, customisation, and a sense of accomplishment.
Types of Blinds and Window Awnings
Blinds and window awnings come in various styles, each offering its unique advantages and aesthetic appeal. Here's a breakdown of the most common types:
Blinds:
- Vertical blinds: Ideal for large windows and sliding glass doors, vertical blinds feature vertical slats that can be tilted to control light and privacy.
- Horizontal blinds: This category includes popular options like Venetian blinds and mini blinds, which consist of horizontal slats that can be raised, lowered, or tilted.
- Roller blinds: Simple yet versatile, roller blinds feature a single piece of fabric that rolls up and down on a tube, offering effortless operation and a clean, modern look.
- Roman blinds: Known for their elegant folds, Roman blinds add a touch of sophistication to any room and can be customised with various fabrics and patterns.
- Panel blinds: Perfect for covering large windows or creating room dividers, panel blinds consist of wide fabric panels that slide along a track for easy adjustment.
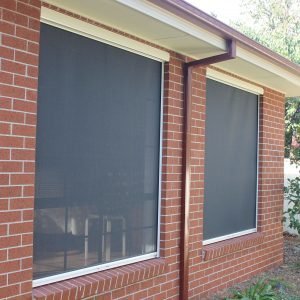
Window Awnings:
- Retractable awnings: These versatile awnings can be extended or retracted as needed, providing shade and protection from the elements while allowing for flexibility in outdoor living spaces.
- Fixed awnings: As the name suggests, fixed awnings are permanently attached to the exterior of a building, offering reliable shade and enhancing curb appeal.
- Motorized vs. manual options: Some awnings come with motorised mechanisms for effortless operation, while others require manual adjustment using a crank or pulley system.
Materials and Tools Needed
Before embarking on your blinds or DIY Folding Arm Awnings project, it's essential to gather the necessary materials and tools. Here's a basic list to get you started:
Materials:
- Blinds or awning components (depending on the type you choose)
- Fabric or slats (for blinds)
- Mounting hardware (brackets, screws, etc.)
- Cord or chain (for blinds)
- Awning fabric (for window awnings)
- Awning frame and hardware
Tools:
- Measuring tape
- Drill
- Screwdriver
- Level
- Pencil
- Scissors or utility knife
- Staple gun (for fabric blinds)
Additionally, you'll want to ensure you have a safe and comfortable workspace, as well as protective gear such as gloves and safety glasses.

Step-by-Step Installation Guide
Now that you have everything you need, let's walk through the installation process for DIY blinds and window awnings:
DIY Blinds:
- Measure your windows: Start by measuring the width and height of your windows accurately, taking into account any obstructions or trim.
- Choose the right type of blinds: Consider factors such as privacy, light control, and aesthetic preferences when selecting blinds for your space.
- Cut and assemble the blinds: If you're opting for custom blinds, follow the manufacturer's instructions for cutting and assembling the components to fit your windows.
- Install the blinds: Using the provided mounting hardware, secure the brackets to the window frame or wall, then attach the blinds and test for smooth operation.
Window Awnings:
- Select the appropriate style and size: Choose an awning style and size that complements your home's architecture and provides adequate coverage for your outdoor space.
- Prepare the installation area: Clean the mounting surface and ensure it's free of debris or obstructions before proceeding.
- Assemble the awning components: Follow the manufacturer's instructions to assemble the awning frame and attach the fabric or covering securely.
- Mount the awning: Use the provided hardware to attach the awning to the exterior wall or overhang, ensuring it's level and securely anchored to withstand wind and weather.
Tips for Customisation and Design
One of the most exciting aspects of DIY blinds and DIY window awnings is the opportunity to customise them to suit your personal style and preferences. Here are some tips to help you get creative:
- Choose the right colours and patterns: Consider the overall colour scheme and decor of your home when selecting fabrics or slats for your blinds or awnings. Opt for neutral tones for a timeless look, or add a pop of colour or pattern for visual interest.
- Incorporate additional features: Enhance the functionality and aesthetic appeal of your window treatments with optional features like valances, trims, or embellishments. These small details can make a big difference in the overall appearance of your blinds or awnings.
Maintenance and Care
To keep your DIY blinds and window awnings looking their best and functioning smoothly, it's essential to perform regular maintenance and care. Here are some tips to help you prolong their lifespan:
- Regular cleaning: Dust or vacuum blinds periodically to remove dirt and debris, and spot clean fabric blinds as needed using mild detergent and warm water. For window awnings, gently scrub the fabric with a soft brush and rinse thoroughly with water.
- Inspect for damage: Check your blinds and awnings regularly for signs of wear or damage, such as frayed cords, broken slats, or loose hardware. Address any issues promptly to prevent further deterioration and ensure optimal performance.
- Protect from the elements: If your blinds or awnings are exposed to harsh sunlight or inclement weather, consider applying a protective coating or treatment to prolong their lifespan and maintain their appearance.
Safety Considerations
When installing DIY blinds online and window awnings, it's crucial to prioritise safety to prevent accidents or injuries. Here are some important safety considerations to keep in mind:
- Follow installation instructions: Always read and follow the manufacturer's instructions carefully when installing blinds or awnings to ensure proper assembly and mounting.
- Secure cords and chains: Keep cords and chains out of reach of children and pets to prevent entanglement or strangulation hazards. Use cord cleats or tensioners to secure loose cords and minimise the risk of accidents.
- Choose child-safe options: Consider purchasing blinds or awnings with built-in child safety features, such as cordless operation or cordless blinds, to reduce the risk of accidents in households with young children.
Conclusion
Dressing your windows with DIY blinds and window awnings is not only a practical way to enhance privacy, light control, and outdoor comfort but also an opportunity to unleash your creativity and express your unique style.
By following the steps outlined in this guide, you can confidently tackle your DIY project and enjoy the satisfaction of transforming your living space with customised window treatments. So, roll up your sleeves, gather your tools, and let your imagination soar as you embark on this exciting home improvement journey!
What's Your Reaction?


![Wireless Connectivity Software Market Size, Share | Statistics [2032]](https://handyclassified.com/uploads/images/202404/image_100x75_661f3be896033.jpg)


