Removing the Power Exhaust K-Series Billet Intake Manifold
Enhancing the performance of your vehicle is a thrilling pursuit for any automotive enthusiast. One of the key components that can make a significant impact on your engine’s power is the intake manifold.
Enhancing the performance of your vehicle is a thrilling pursuit for any automotive enthusiast. One of the key components that can make a significant impact on your engine’s power is the intake manifold. In this guide, we will delve into the process of removing the Power Exhaust K-Series Billet Intake Manifold, a crucial step for those looking to maximize their engine’s potential. We’ll break down the steps in a simple and easy-to-understand manner, empowering you to take control of your vehicle’s performance.
Understanding the Power Exhaust K-Series Billet Intake Manifold
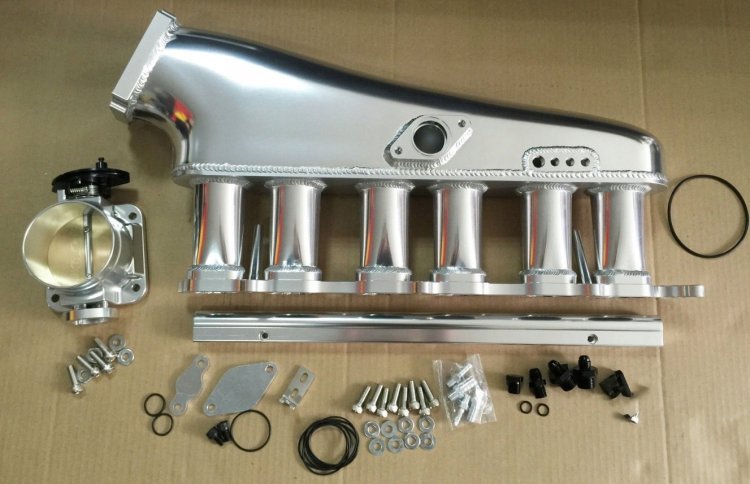
Before we embark on the removal process, it’s essential to grasp the significance of the Power Exhaust K-Series Billet Intake Manifold. This component plays a pivotal role in regulating the air-fuel mixture that enters the engine cylinders. The billet construction of this intake manifold ensures durability and improved airflow, contributing to enhanced engine efficiency and power output.
1: Gather Necessary Tools and Materials
Before diving into the removal process, make sure you have all the required tools and materials on hand. Here’s a basic list to get you started:
- Socket and wrench set
- Screwdrivers
- Torque wrench
- Gasket scraper
- Replacement gaskets
- Container for storing removed bolts and nuts
- Work gloves and safety glasses
Having these tools ready will streamline the removal process and ensure you are well-prepared for any challenges that may arise.
2: Disconnect the Battery
Safety should always be a top priority when working on your vehicle. Begin by disconnecting the negative terminal of the battery to prevent any electrical mishaps during the removal process. This precautionary step is crucial when dealing with electronic components near the intake manifold.
3: Remove the Air Intake System
To access the intake manifold, you’ll need to remove the air intake system. Start by disconnecting the air filter housing and loosening the clamps that secure the intake tube. Carefully disconnect any sensors attached to the air intake system. Once disconnected, set the air intake components aside.
4: Detach Fuel Lines and Injectors
Next, disconnect the fuel lines and injectors connected to the intake manifold. Be cautious and follow proper safety procedures when dealing with fuel components. Use a rag to catch any fuel that may spill during this step. Remember to relieve the fuel system pressure before disconnecting any fuel lines.
5: Disconnect Throttle and Vacuum Lines
Proceed to disconnect the throttle and vacuum lines connected to the intake manifold. Take note of their positions to facilitate easy reinstallation later. Labeling or taking pictures can be helpful for reference during the reassembly process.
6: Remove the Intake Manifold Bolts
Using the appropriate socket and wrench sizes, carefully remove the bolts securing the intake manifold to the engine. Start from the outer bolts and work your way toward the centre, gradually loosening them in a crisscross pattern. Place the removed bolts in a container to keep them organized.
7: Gently Pry Off the Intake Manifold
With the bolts removed, gently pry off the intake manifold from the engine. Take care not to damage the mating surfaces, and use a gasket scraper to clean any remaining gasket material. Inspect the manifold and engine surfaces for any signs of damage or wear.
8: Install the Replacement Intake Manifold
If you’re upgrading to a new Power Exhaust K-Series Billet Intake Manifold, now is the time to install it. Place the new manifold onto the engine, ensuring proper alignment with the cylinder head. Insert and hand-tighten the bolts before torquing them down to the manufacturer’s specifications in a crisscross pattern.
9: Reconnect Throttle, Vacuum Lines, and Fuel Components
Reverse the process of disconnecting the throttle, vacuum lines, and fuel components. Ensure all connections are secure and properly tightened. Pay special attention to the fuel lines, using new O-rings if necessary.
Step 10: Reinstall the Air Intake System
Reattach the air intake system, connecting the intake tube, air filter housing, and any sensors. Double-check all connections to ensure a secure fit. This step is crucial for maintaining proper airflow and ensuring optimal engine performance.
Step 11: Reconnect the Battery
Finally, reconnect the negative terminal of the battery. This step completes the removal and replacement process. Turn the ignition key to the “on” position without starting the engine to pressurize the fuel system, and check for any fuel leaks around the fuel lines and injectors.
Conclusion
Removing the Power Exhaust K-Series Billet Intake Manifold is a rewarding endeavour for those seeking to unlock their vehicle’s full potential. By following these step-by-step instructions, you can confidently upgrade your intake manifold and experience improved engine performance. Remember to adhere to safety precautions, take your time, and enjoy the process of enhancing your vehicle’s capabilities. With this newfound knowledge, you’re ready to embark on a journey of increased power and exhilarating driving experiences.
What's Your Reaction?


![Wireless Connectivity Software Market Size, Share | Statistics [2032]](https://handyclassified.com/uploads/images/202404/image_100x75_661f3be896033.jpg)


